Safety gear
Tyre Puncture Repair Kit: Tools and Their Limits
By Samveg Jain · Updated 21 October 2026 · 6 min read
Some links on this site may be affiliate links. If you buy through them we may earn a commission, at no extra cost to you. It never changes what we recommend. How this works.
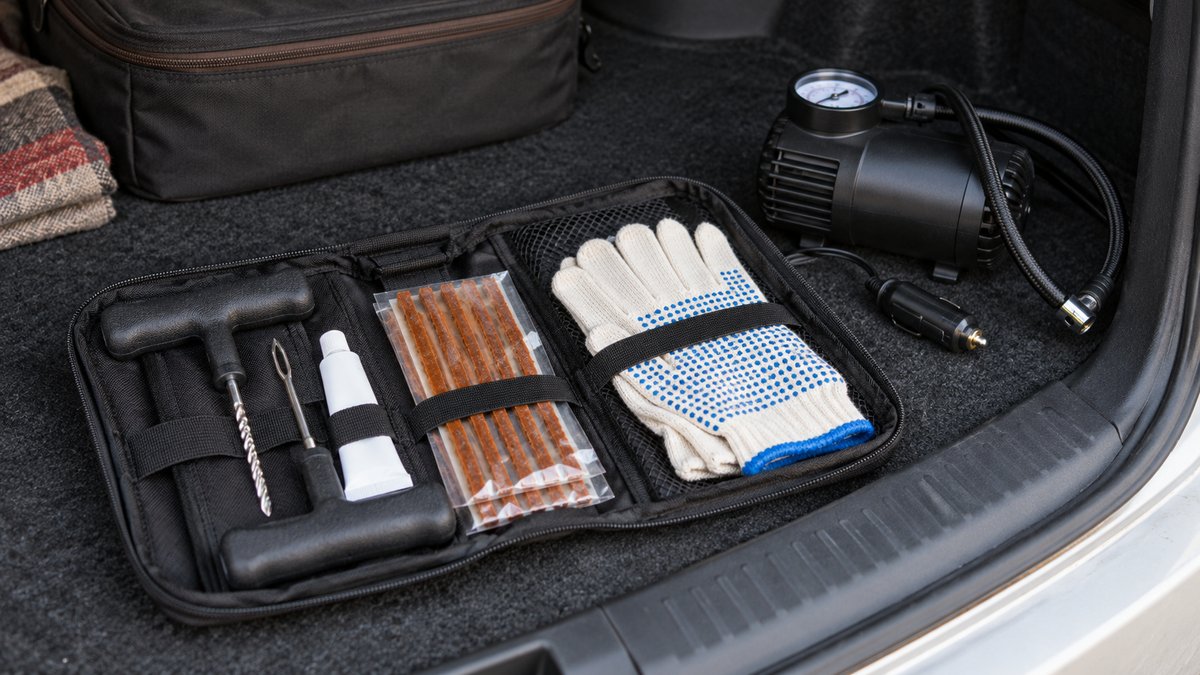
Choose a tyre puncture repair kit as emergency equipment with narrow limits, rather than a replacement for tyre inspection. Confirm the tyre type, the vehicle's approved provision and the kit's stated uses. External plugs and sealants cannot address every flat tyre. If damage is uncertain, the tyre has run flat or the stopping location is unsafe, roadside assistance is the better plan.
Identify the tyre and emergency setup first
Check whether the car has tubeless tyres, an approved sealant system, a spare or another manufacturer-specified arrangement. A generic plug kit may be irrelevant to a tyre with a tube, and a sealant may be incompatible with certain tyre constructions or monitoring systems. Read the vehicle handbook and tyre information before comparing tool bundles.
Inspect the equipment already supplied with the car. A missing inflator connector or expired sealant bottle can make the factory kit unusable. If a spare is supplied, check its condition and the procedure for accessing it with luggage loaded. Buying an additional pouch should address a real gap rather than duplicate tools without improving your options.
Check the manufacturer's instructions for both the repair product and vehicle. Ask a qualified tyre professional about suitability if your tyres have special features. Do not rely on a seller's universal-fit claim when the consequences include being stranded with a product that cannot be used on your tyre.
Understand why external repairs have limits
A puncture visible from outside does not reveal all internal damage. A tyre driven while substantially deflated may have damage that cannot be judged by looking at the hole. Tyre repair guidance from a tyre manufacturer stresses internal inspection and does not recommend an outside-only plug as a permanent repair. That is the reason to plan workshop assessment after an emergency measure.
Sidewall damage, large cuts, bead problems and some previous repairs fall outside what a simple tread kit can resolve. Do not repeatedly add strips or sealant to make a visibly damaged tyre hold air. A temporary improvement in pressure does not demonstrate that the casing is structurally sound.
This buying guide does not replace hands-on training. Tools that require force, trimming or inserting material into a tyre can be misused. If you are considering such a kit, learn its authorised procedure before needing it beside a road. Do not make a first attempt on an active shoulder with poor visibility and passing traffic.
Compare the kit types
Sealant kits usually combine a product intended for certain punctures with an inflator or another means of restoring pressure. Check expiry date, storage temperature, tyre size coverage and required procedure. Read the limits for speed and distance printed on that particular kit. Different products should not be treated as interchangeable.
External plug kits commonly include insertion tools and sealed repair material for compatible tubeless tyres. Compare handle construction, storage protection and consumable condition. A tool list that looks generous is less useful than clear instructions explaining when the kit must not be used. Treat open or dried repair material as a maintenance problem to resolve before travel.
Some kits provide gloves, valve tools or small pliers. These can improve handling, but none widens the permitted repair area or makes internal inspection unnecessary. Do not choose by the number of pieces. Count the functions you understand, and check whether the essentials fit your car and intended emergency response.
Inflation and pressure checking remain separate jobs
A repair pouch without a way to restore and verify pressure may leave you unable to assess the result. Choose an inflator with a suitable power connection, hose reach and duty cycle. A small cordless unit also needs a charging plan; a socket-powered unit needs a compatible vehicle outlet and manageable lead routing.
Our tyre inflator buying guide explains those fit questions. Carry a pressure gauge you can use reliably rather than judging inflation by how the tyre looks. Use the vehicle's specified pressures and any temporary-repair restrictions that apply, instead of treating an inflated appearance as proof that the journey can continue normally.
Do not disconnect or remove an embedded object just to inspect it on a roadside. That can worsen a leak and reduce your remaining options. First establish a safe stopping place, identify the approved response and decide whether assistance is required. A photograph for a tyre professional can be more useful than exploratory tool work.
Check the kit before every long journey
- Confirm the vehicle and tyre compatibility has not changed after tyre replacement.
- Inspect sealant expiry dates and storage requirements.
- Check that consumables are sealed and tools are complete.
- Test the inflator and check the cable, hose and connector.
- Keep the instructions readable and available offline.
- Save roadside assistance details and the tyre workshop plan.
- Pack the kit where it remains reachable under luggage.
Put stopping safety above repair convenience
Use the roadside safety kit guide to prepare warning equipment, while following local rules and road conditions when stopping. Do not kneel beside a wheel next to fast traffic because the tools are within reach. Stay clear of the carriageway and seek appropriate help when the location is dangerous.
After using a temporary product, tell the workshop what was used and arrange the inspection required by the tyre maker. Retain the packaging or photograph the label so its restrictions are not lost. Record replacement consumables on your packing checklist. A repair kit is useful when its limits are clear before the puncture, not when it encourages continuing on a tyre whose condition is unknown.
What to look for when you buy
Vehicle-approved sealant kit
Tyre compatibility, expiry date and documented driving limits.
Tubeless emergency plug kit
Clear limitations, sealed consumables and tools you are trained to use.
Portable tyre inflator
Suitable vehicle supply, workable hose length and a documented duty cycle.
Compact pressure gauge
Readable units, a valve connection you can reach and protective storage.
Frequently asked questions
Is an external plug a permanent repair?
Do not treat it as one. Professional assessment requires inspecting the inside of the tyre and following the tyre maker’s repair rules.
Can a kit fix a sidewall cut?
A tread puncture kit is not a solution for sidewall damage, a torn tyre or damage from running flat. Seek assistance.
Do repair kits replace a spare wheel?
They cover a narrower range of problems. Decide around your vehicle’s approved equipment and access to roadside help.
Can sealant affect later repair?
It may change the workshop process and suitability. Tell the tyre technician what was used and follow the kit and tyre instructions.
More guides

Safety gear
Car Safety Around Firecrackers: Parking for Diwali
A practical parking and inspection plan for Indian car owners before and after Diwali celebrations.

Safety gear
Night Driving Checklist: Lights, Glare, Fatigue and Kit
Prepare for an evening drive with checks for lights, glass, mirror glare, fatigue and breakdown equipment, plus clear reasons to delay.
Safety gear
Tyre Tread Depth: Check Wear Before Buying Replacements
Inspect tread grooves, wear indicators and uneven wear before choosing replacement tyres. Know when a professional inspection cannot wait.