Road trips
Road Trip Packing List for India: Pack by Access
By Samveg Jain · Updated 21 October 2026 · 6 min read
Some links on this site may be affiliate links. If you buy through them we may earn a commission, at no extra cost to you. It never changes what we recommend. How this works.
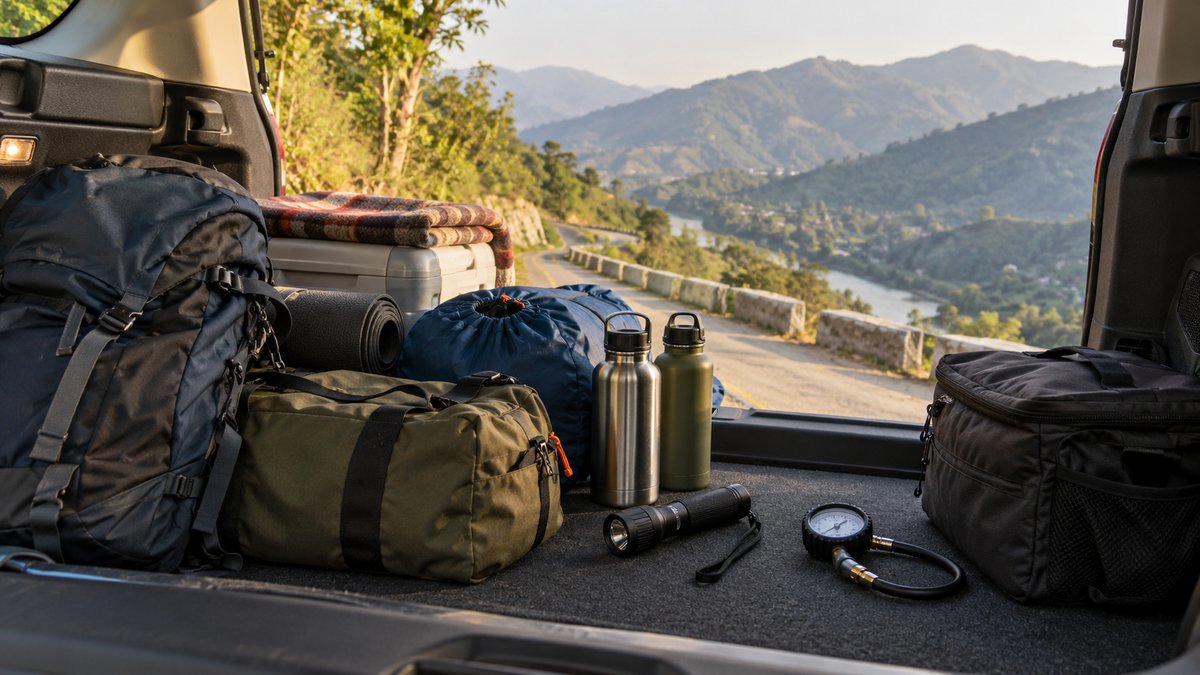
Pack for an Indian road trip in three access zones: items needed during ordinary stops, equipment needed beside a stationary car, and luggage needed only at the destination. Secure heavy bags low, keep the driver's area clear, and leave roadside equipment reachable. Match the quantity of water, clothing and backup supplies to the route rather than filling every available space.
Write the journey on paper first
A city-to-city highway run with frequent services needs a different load from a remote hill route. List the longest planned section without dependable fuel, food, charging or accommodation. Note the weather you may encounter and the needs of every passenger. Those details tell you where extra supplies are useful and where they only add weight.
Keep relevant vehicle documents, insurance and assistance contacts accessible. Store an offline copy of the route and the accommodation address, with a paper backup of important numbers. Mobile reception and battery life are separate problems, so downloading a map does not remove the need to plan charging. Check local rules and current road restrictions before setting out.
Zone one: a small cabin day bag
Pack drinking water, tissues, a rubbish pouch, essential personal items and snacks that suit the journey. Put medication in storage recommended by its manufacturer or pharmacist, rather than assuming a parked cabin is a suitable cupboard. A compact day bag is easier to control than loose bottles and packets scattered between seats.
The passenger should manage the bag. Keep everything away from pedals, seat rails, airbag covers and the dashboard. Do not hang heavy bottles where they can swing into occupants. If you need an item that has rolled out of reach, stop safely before retrieving it. Convenient access should reduce distraction, not create permission to search while driving.
Give wet items their own pouch during monsoon travel. A spare cloth for shoes and a separate clean cloth for glass prevent dirty water spreading through the cabin. Use the seat and boot organiser guide to choose a place for these supplies without covering seat functions or interfering with restraints.
Zone two: the roadside bag
Keep the warning triangle, reflective clothing, torch and other roadside equipment together. Make the bag identifiable in poor light. A plain dark pouch beneath several identical suitcases is difficult to find when everyone is tired. Put it where opening the boot reveals it immediately, without needing to remove a child seat or a heavy cooler.
Choose equipment you understand before departure. Check the manufacturer's instructions for each safety item and the vehicle handbook for the car's own equipment. A tool purchase does not make a high-speed road shoulder a suitable place to work. If stopping conditions are unsafe, prioritise reaching safety and contacting assistance over deploying your entire kit.
Our warning triangle and safety kit guide covers the buying decisions in more detail. Add a first aid kit that is easy to identify and open. Inspect contents before leaving, including expiry dates and damaged wrappers, rather than treating the presence of a bag as proof that it is ready.
Zone three: secured luggage and overnight gear
Place dense luggage low and secure it to appropriate points. Follow the vehicle's loading guidance and retain a clear view through the windows. Soft bags often fit around a boot's shape more efficiently than hard cases, but they still need restraint. An organiser's carrying handles are not automatically rated tie-down points.
Check access to the spare wheel, jack storage and towing information. A careful packing layout can still fail if a puncture requires emptying all the luggage onto wet ground. Keep a light empty bag available for temporarily containing items while you retrieve vehicle equipment. Photograph the packed boot so both drivers understand where the important things are stored.
Do not use the roof as an overflow area without checking the vehicle and carrier limits, fitting requirements and overall height. A roof box changes access and clearance needs. For an occasional short trip, reducing the luggage may be a better solution than adding a new carrying system you have not trialled.
A practical departure checklist
- Documents, assistance details and offline navigation are accessible.
- Water and food quantities match the longest uncertain section of the route.
- Warning equipment and first aid supplies can be reached with the boot loaded.
- Tyre equipment suits the vehicle and has been checked before travel.
- Chargers, cables and torch batteries work, with leads clear of controls.
- Bags are restrained, windows remain clear and no loose object occupies an airbag zone.
- Wet clothing, rubbish and dirty footwear have separate storage.
Use a tyre pressure gauge before departure and set pressures according to the car's load guidance. Packing cannot compensate for overdue maintenance or an unresolved warning light. A pre-trip inspection should happen early enough to leave time for professional help, rather than minutes before the family gets into the car.
Plan water and food without overcomplicating storage
Several manageable bottles are often easier to distribute than one heavy container that must be lifted at every stop. Check lids for leaks and keep drinking supplies separate from cleaning chemicals. Store spare water where its weight can be restrained, not on a rear parcel shelf. Refill only from a source you consider suitable for drinking.
Perishable meals need a proper temperature plan. If that is hard to maintain, choose food that does not need chilling and buy fresh meals along the route. The cool box versus car fridge comparison explains when cold storage adds practical value and when it adds unnecessary power and space demands.
Repack after the first overnight stop
Trips generate wet towels, empty wrappers and bags that no longer close neatly. Recheck restraints and access each morning instead of assuming the original packing order survives. Return the torch and safety bag to their assigned place after use. Keep a list of supplies consumed so replenishment happens before the next remote section.
After returning home, remove items that were never useful and note anything you repeatedly searched for. That makes the next packing list specific to your car and passengers. Buying one missing item is more useful than adding another general accessory bundle to a boot already crowded with duplicates.
What to look for when you buy
Compact roadside equipment bag
A visible location, separate compartments and access without unloading the boot.
Secured soft luggage
Dimensions that preserve rear visibility and straps suited to luggage anchors.
Refillable water containers
Leakproof closures, practical carrying weight and a food-safe construction.
Document pouch
Water resistance and space for paper copies of key details.
Frequently asked questions
What should stay within easy reach?
Water, essential medication, documents and a small passenger day bag. Keep roadside gear accessible when the boot is full.
Should I carry every repair tool?
Carry equipment you can use safely and that matches the vehicle. Roadside assistance is more useful than unfamiliar tools in a dangerous location.
How should heavy bags be packed?
Low and secured using suitable vehicle luggage points, within the vehicle’s load limits.
What changes for monsoon trips?
Add dry bags, spare footwear and cleaning cloths, and check weather and road status before departure.
More guides
Road trips
Diwali Traffic Driving Tips for Crowds, Smoke and Delays
How to prepare for a slow festive journey and give yourself room to react when crowds and smoke change the road ahead.
Road trips
Car Seat Cushions: Fit Checks for Long Drives
Check cushion thickness, belt routing, pedal reach and airbag clearance before adding seat padding or lumbar support for a long drive.
Road trips
Pre-Trip Car Inspection: Mechanical Checks Before Travel
Check fluids, tyres, lights and brake behaviour before Diwali or wedding-season travel, with time to repair faults before departure.